
Important BarTender Printer Settings
Upon creation of a new BarTender Template it is important that certain print settings are adjusted correctly. The Default settings often do not achieve acceptable print quality when printing to nursery stock. This guide will walk you through the process of adjusting those Key settings.
Note: When working with Datamax printers and BarTender, always adjust printer settings through BarTender and NOT through the printer's menu interface.
Begin by creating the BarTender template you need. With that done, open the “Print Dialog” window within BarTender ( Click on the print icon located in the upper left portion of the tool bar) Do not use Window’s control panel or the print driver to change any settings.
Step 1: Click on “Document Properties”.

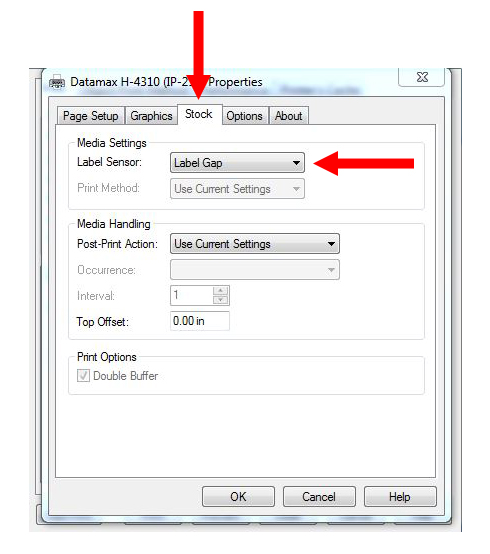
Step 2: Click on the “Stock” tab.
BarTender needs to tell the printer specifically what Label Sensor setting to use that reflects the stock being printed on. Example:
• Disabled (used for continuous stock).
• Label Gap (used for Die-cut or notched stock).
• Label Mark (used for stock that has a Blackmark).
Note: If left at the default setting of “Use Current Settings”, most likely you will encounter labels that “skip” during imprinting. For instance, two labels might print followed by three of four labels that do not. If you have labels that skip, always check this setting first. Most nursery stock incorporates “Notched” or “ Hole” punch material so the Label Sensor needs to be set at “Label Gap”.
Step 3: Click the “Options” tab.
Adjust the following fields as shown. When printing thicker material, such as pot stakes and wrap arounds, a slower speed is recommended. Thick material at high print speeds can cause alignment and print quality problems.
The print head temperature setting can vary greatly depending on the stock being printed on. A good range to start is between 19 – 24. If print looks faded, experiment with higher temperatures until desired results are achieved. If print is dark with a slight smearing of edges or lines the temperature is set to high.
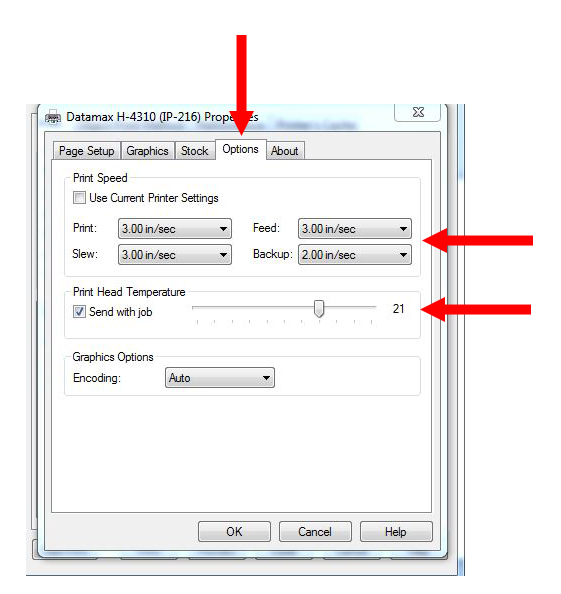
Note: To help protect the life of the print head always print at the lowest possible heat setting that yields the desire print quality.
Hit “Ok” and save your template to keep changes.
You are now good to print !


Login and Registration Form